19. June 2024 By Daniil Zaonegin
Create .NET Blazor Hosted App with the new Blazor Web App Project Template (in .NET 8)
Blazor is a .NET front-end framework for creating an interactive web UI with C# and not JavaScript. This offers many advantages, such as being able to share code between the back-end and front-end. With Blazor, you no longer have to use two different languages, JavaScript for the frontend and C# for the backend. This makes it easier to reuse code and write consistent applications in a familiar language environment. In addition, many errors can be resolved at compile time and no longer occur dynamically at application runtime, as was the case in JavaScript.
The Blazor hosting models
Blazor WebAssembly hosting model
Client-side components are executed in the browser using a WebAssembly-based .NET runtime. All Razor components, their dependencies and the .NET runtime are loaded into the browser and executed in it. The user interface is updated and events are handled in the same process.
Advantages of this hosting model
- Blazor WebAssembly provides a faster user experience because UI updates are instantaneous without the need for a round trip to the server.
- It enables offline functionality and can be run as a Progressive Web App (PWA).
- Scaling the application is easier because all users run a copy of the application.
Disadvantages of this hosting model
- Blazor WebAssembly requires more client-side resources to be downloaded and executed, resulting in a slow load time when the application is first launched.
- It can be less secure because sensitive data and business logic are downloaded and executed on the client side. Client code can be accessed by users.
- WebAssembly is executed in a secure environment in the browser. Therefore, there are many limitations and not all .NET libraries can be used.
Blazor server hosting model
With this approach, the browser only handles the rendering, all the code is executed on the server. A permanent connection to the server is established using SignalR, an open source library that enables real-time web applications.
Advantages of this hosting model
- It is relatively simple, the code is executed on the server in a normal .NET process and you can use full .NET with all libraries.
- It has shorter load times on first app launch because less client-side code needs to be downloaded and executed.
- It offers a better security model as sensitive data and business logic is stored on the server and client has no access to it.
Disadvantages of this hosting model
- Blazor Server requires a constant connection to the server, which can be a disadvantage if users have a weak or unreliable internet connection.
- Implementing complex UI interactions can be more difficult as UI updates are slower than with Blazor WebAssembly.
- Scaling the application can be a big challenge because maintaining a constant connection between server and client requires a lot of resources.
Both hosting models have their advantages and disadvantages. Until .NET 7, it was possible to deliver a Blazor application in a so-called "hosted template". The template was a standard ASP.NET core app that delivered a Blazor app to the client. This template made it possible to use the WebAssembly variant and simultaneously execute sensitive logic on the server. This made it possible to benefit from the advantages of both models and reduce the disadvantages at the same time. Unfortunately, this template no longer exists since .NET 8. However, there is a new template that offers the same functionality.
The new Blazor web app template
In this article, we will take a closer look at the new Blazor web app with InteractiveAuto render mode. This template activates an automatic server-side pre-rendering of the WebApp pages. First, users see a page that has been rendered on the server. The UI logic is executed on the server and transferred to the frontend via a web sockets connection. As soon as the app binaries are fully loaded, the client closes the web socket connection and uses Wasm assemblies in the browser.
A corresponding Blazor web app can be created with this cli command:
dotnet new blazor --interactivity Auto -n BlazorWeatherApp
This gives us the following project:
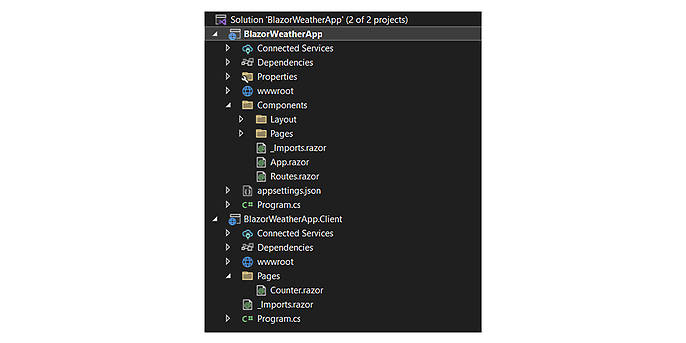
BlazorWeatherApp
A Blazor server project containing the pages and components. These can be either statically rendered on the server side or interactive.
- Statically rendered components are transferred from the server to the client as simple HTML files and have no interactivity.
- Components rendered interactively on the server side are interactive and are executed on the server side. They are transferred to the client via a web sockets connection.
BlazorWeatherApp.client
The Blazor client project that contains the components that use either WebAssembly rendering or automatic rendering. First, these components are rendered on the server side and then, when the DLL files are downloaded in the browser, rendering is done on the client side in WebAssembly.
This project template allows us to write both server-side and client-side rendered components in an app. It also solves the problem of long loading times on first launch. If the page uses rendering mode "Auto", then the application uses server-side rendered pages at startup and switches to using WebAssembly with all its advantages as soon as all required DLLs have been transferred to the client. If the WebAssembly version does not work, the application automatically reverts to a server-side rendered page. Let's write an example for this page.
Creating a WebAssembly page in the Blazor.Client project
Pages that are executed via WebAssembly are created in the BlazorWeatherApp.Client project. The following figure shows the raw structure of such a page.
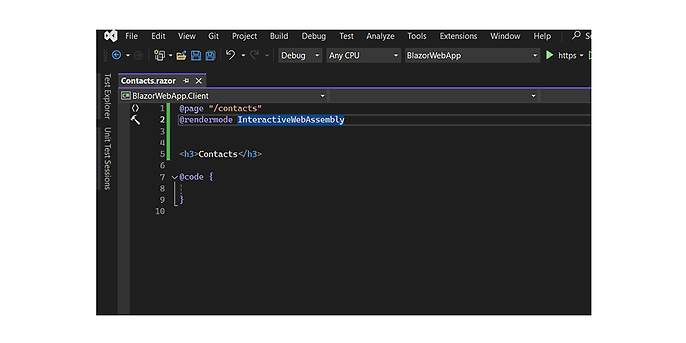
@rendermode InteractiveWebAssembly instructs Blazor to render the page in the browser.
@page tells Blazor which route the component has. The component with route is a web page. More about this here: Pages, Routing and Layouts - .NET | Microsoft Learn.
Let's create a simple page that retrieves data from the backend. For this we will use a controller on the server side (in BlazorWebApp).
Create a controller in the server project
In the server project, we will create a simple WeatherForecastController that comes from the ASP.NET Core Web API template.
	using BlazorWeatherApp.Shared;
		using Microsoft.AspNetCore.Mvc;
		namespace BlazorWeatherApp.Controller;
		[ApiController]
		[Route("[controller]")]
		public class WeatherForecastController : ControllerBase
		{
		    private static readonly string[] Summaries = new[]
		    {
		        "Freezing", "Bracing", "Chilly", "Cool", "Mild", "Warm", "Balmy", "Hot", "Sweltering", "Scorching"
		    };
		    private readonly ILogger<WeatherForecastController> _logger;
		    public WeatherForecastController(ILogger<WeatherForecastController> logger)
		    {
		        _logger = logger;
		    }
		    [HttpGet(Name = "GetWeatherForecast")]
		    public IEnumerable<WeatherForecast> Get()
		    {
		        return Enumerable.Range(1, 5).Select(index => new WeatherForecast
		            {
		                Date = DateOnly.FromDateTime(DateTime.Now.AddDays(index)),
		                TemperatureC = Random.Shared.Next(-20, 55),
		                Summary = Summaries[Random.Shared.Next(Summaries.Length)]
		            })
		            .ToArray();
		    }
		}
I created the model (WeatherForecast) in the BlazorWeatherApp.Shared project. This project is a simple class library that is referenced by both the BlazorWeatherApp.Client and the BlazorWeatherApp. The final project structure in the solution looks like this:
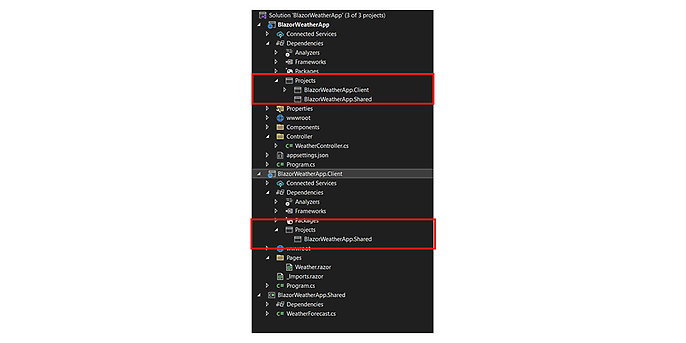
The BlazorWeatherApp.Shared project contains classes that are used by both the server project (BlazorWeatherApp) and the client project (BlazorWeatherApp.Client).
Since we use a controller to retrieve data from the server, we need to add the necessary ASP.NET Core Services to the dependency injection using the AddControllers() method.
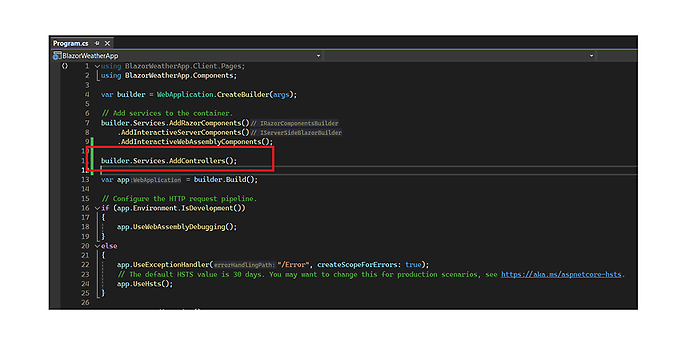
Retrieving data on the frontend
To retrieve the data from the frontend, we need an HttpClient. There are various ways to use this. At this point, we use an HttpClientFactory. To be able to use this and insert it via dependency injection, we need to add the Microsoft.Extensions.Http package to the project and make the factory or the HttpClient available via AddHttpClient().
	using Microsoft.AspNetCore.Components.WebAssembly.Hosting;
		var builder = WebAssemblyHostBuilder.CreateDefault(args);
		builder.Services
		    .AddHttpClient()
		    .ConfigureHttpClientDefaults(
		        d => d.ConfigureHttpClient(c => c.BaseAddress = new Uri(builder.HostEnvironment.BaseAddress)));
		await builder.Build().RunAsync();
In the code section shown above, I have also configured the BaseAddress of the HttpClient as the BaseAddress of the web application (builder.HostEnvironment.BaseAddress).
Now we can retrieve the data in our weather page. To do this, we need to inject the HttpClient into the page. The data can be retrieved during the initialisation of the component, for example. To do this, we overwrite the OnInitializedAsync() method and call the GetFromJson() extension method of the HttpClient. You can see the complete code for the page here:
	@page "/weather"
		@using BlazorWeatherApp.Shared
		@rendermode InteractiveWebAssembly
		@inject HttpClient Http
		<h3>Weather</h3>
		@if (_weatherForecast == null)
		{
		    <div>Loading...</div>
		}
		else
		{
		    <table class="table">
		        <thead>
		        <tr>
		            <th>Date</th>
		            <th>Temp. (C)</th>
		            <th>Temp. (F)</th>
		            <th>Summary</th>
		        </tr>
		        </thead>
		        <tbody>
		            @foreach (var row in _weatherForecast)
		            {
		                <tr>
		                    <td>@row.Date</td>
		                    <td>@row.TemperatureC</td>
		                    <td>@row.TemperatureF</td>
		                    <td>@row.Summary</td>
		                </tr>
		            }
		        </tbody>
		    </table>
		}
		@code {
		    private WeatherForecast[]? _weatherForecast;
		    protected override async Task OnInitializedAsync()
		    {
		        _weatherForecast =
		await Http.GetFromJsonAsync<WeatherForecast[]>("WeatherForecast");
		    }
		}
When you start the project, the page should logically be rendered interactively in WebAssembly in the browser. But when you call up the Weather page, you get an error instead:
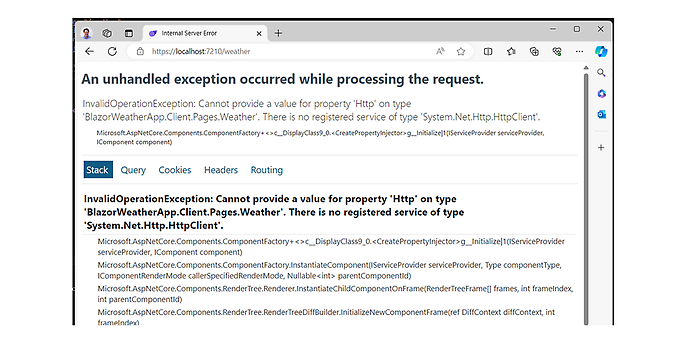
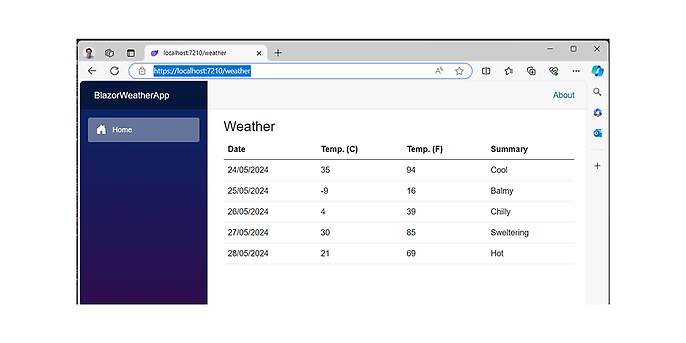
Very strange, we have added the HttpClient to the dependency injection. The reason for this behaviour at this point is that prerendering is activated by default, which means that the system now tries to render the pages on the server first. The WebAssembly app (to which we have added the HttpClient) only starts after all the required libraries have been loaded into the browser. To solve this problem, we can deactivate prerendering. To do this, we change the line with @rendermode as follows: @rendermode @(new InteractiveWebAssemblyRenderMode(prerender: false)). This will make the page work and we will see the result:
Vorrendern Fix
To fix the problem with pre-rendering, we need to retrieve weatherforecast data on the server. For this we should use a typed HttpClient in the client project (BlazorWeatherApp.Client) (more here: Use IHttpClientFactory to implement resilient HTTP requests - .NET | Microsoft Learn)
	using System.Net.Http.Json;
		using BlazorWeatherApp.Shared;
		namespace BlazorWeatherApp.Client.Services;
		public class ClientWeatherService: IWeatherService
		{
		    private readonly HttpClient _http;
		    public ClientWeatherService(HttpClient http)
		    {
		        _http = http;
		    }
		    public Task<WeatherForecast[]?> GetWeatherForecastsAsync()
		    {
		        return _http.GetFromJsonAsync<WeatherForecast[]?>("WeatherForecast");
		    }
		}
I created the IWeatherService interface in BlazorWeatherApp.Shared so that we can also use it in the server project.
	namespace BlazorWeatherApp.Shared;
		public interface IWeatherService
		{
		Task<WeatherForecast[]?> GetWeatherForecastsAsync();
		}
Now you can register a typed HttpClient and use it on the Weather page. Here is our new Program.cs file. For the dependency injection registration, we use the AddHttpClient<>() extension method:
	using BlazorWeatherApp.Client.Services;
		using BlazorWeatherApp.Shared;
		using Microsoft.AspNetCore.Components.WebAssembly.Hosting;
		var builder = WebAssemblyHostBuilder.CreateDefault(args);
		builder.Services
		    .AddHttpClient<IWeatherService, ClientWeatherService>(
		        c => c.BaseAddress = new Uri(builder.HostEnvironment.BaseAddress));
		await builder.Build().RunAsync();
Now we can rewrite the Weather page like this
	@page "/weather"
		@using BlazorWeatherApp.Shared
		@rendermode @(new InteractiveWebAssemblyRenderMode(prerender: false))
		@inject IWeatherService WeatherService
		@* ... *@
		@* Code omitted for brevity *@
		@* ... *@
		@code {
		    private WeatherForecast[]? _weatherForecasts;
		    protected override async Task OnInitializedAsync()
		    {
		        _weatherForecasts =
		await WeatherService.GetWeatherForecasts();
		    }
		}
Now IWeatherService is injected on the page instead of HttpClient. On the client side, IWeatherService is initialised as a typed HttpClient, which means that an HttpClient is available within the created object, which we can use to access the controller in the backend.
On the server side, however, we naturally do not need an HttpClient - we are on the server and therefore have direct access to the data. We therefore use a different class on the server side, which also implements IWeatherService:
	using BlazorWeatherApp.Shared;
		namespace BlazorWeatherApp.Services;
		public class ServerWeatherService : IWeatherService
		{
		    private static readonly string[] Summaries = new[]
		    {
		        "Freezing", "Bracing", "Chilly", "Cool", "Mild", "Warm", "Balmy", "Hot", "Sweltering", "Scorching"
		    };
		    public Task<WeatherForecast[]?> GetWeatherForecastsAsync()
		    {
		        return Task.FromResult(Enumerable.Range(1, 5).Select(index => new WeatherForecast
		        {
		            Date = DateOnly.FromDateTime(DateTime.Now.AddDays(index)),
		            TemperatureC = Random.Shared.Next(-20, 55),
		            Summary = Summaries[Random.Shared.Next(Summaries.Length)]
		        }).ToArray())!;
		    }
		}
I copied the code from the WeatherController. Now we can register the service in the server app (not as an HttpClient, of course, but simply as a scoped object). The advantage: We can now also inject this class in the controller and thus avoid duplicated code
	BlazorWeatherApp/Program.cs:
		//…
		//Code omitted for brevity
		//…
	builder.Services.AddControllers();
		builder.Services.AddScoped<IWeatherService, ServerWaetherService>();
		WeatherController.cs:
		[ApiController]
		[Route("[controller]")]
		public class WeatherForecastController : ControllerBase
		{
		    private readonly ILogger<WeatherForecastController> _logger;
		    private readonly IWeatherService _weatherService;
		    public WeatherForecastController(ILogger<WeatherForecastController> logger,
		        IWeatherService weatherService)
		    {
		        _logger = logger;
		        _weatherService = weatherService;
		    }
		    [HttpGet(Name = "GetWeatherForecast")]
		    public Task<WeatherForecast[]?> Get()
		    {
		        return _weatherService.GetWeatherForecastsAsync();
		    }
		}
Now you can reactivate prerendering in the client, ideally with "Interactive Auto" to automatically load the web assembly page as soon as it is available in the browser. Prior to this, the page is rendered on the server.
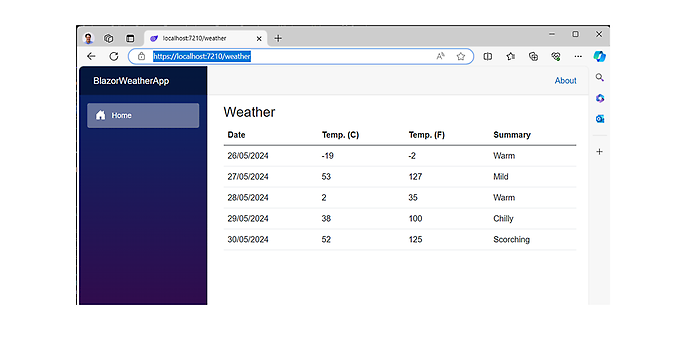
When loading, the data determined by the server is displayed first. As soon as all DLLs for the client app have been transferred, this data changes - because the WebAssembly app now starts and retrieves its data from the server again.
Saving the render state
It is not always desirable for the data to be reloaded; depending on the application, you may want to transfer the current state, which originates from prerendering, to the client app. This prevents the data from having to be reloaded. This works via the PersistentComponentState. This class is passed via the DependencyInjection and can be used as follows:
	@page "/weather"
		@* Code omitted for brevity *@
		@implements IDisposable
		@inject PersistentComponentState ApplicationState
		@* Code omitted for brevity *@
		@code {
		    private WeatherForecast[]? _weatherForecasts;
		    private PersistingComponentStateSubscription _subscription;
		    protected override async Task OnInitializedAsync()
		    {
		        _subscription = ApplicationState.RegisterOnPersisting(Persist);
		        var foundInState =
		ApplicationState.TryTakeFromJson<WeatherForecast[]>("weather", out var forecasts);
		        _weatherForecasts = foundInState
		             ? forecasts
		            : await WeatherService.GetWeatherForecastsAsync();
		    }
		    private Task Persist()
		    {
		       ApplicationState.PersistAsJson("weather", _weatherForecasts);
		       return Task.CompletedTask;
		    }
		    public void Dispose()
		{
		        _subscription.Dispose();
		    }
		}
The ApplicationState.RegisterOnPersisting() method is used to register the callback method that is called when the server application is stopped and the client application is started. The data can be saved using the ApplicationState.PersistAsJson() method and retrieved from the persistent state using the ApplicationState.TryTakeFromJson() method. The state is transferred from the server to the client app as JSON and can only be used once (after which the ApplicationState.TryTakeFromJson() method returns false). This means that the data is no longer reloaded.
Summary
We have created a Blazor application that has similar features to the Blazor ASP.NET Hosted App from .NET 7. This application consists of a WebAssembly project where you can create WebAssembly components and a server project where you can write APIs, work with a database and do everything that is not possible in WebAssembly in the browser. Other possibilities are:
- 1. you can create server-side rendered pages where all the logic is executed on the server and then passed to the client.
- 2. you can also write pages with auto-rendering mode. The code of these pages is first executed on the server (if the DLL files of the application have not yet been downloaded in the browser) and then transferred to the browser via a WebSocket connection. Once the DLL files are loaded, the WebAssembly application starts, which can also work offline (as long as the data is loaded from the server). However, this requires writing code on both the server and the client, in the WebAssembly version.
You can find the source code of the app on Github: daniilzaonegin/BlazorWeatherApp: Example of new Blazor Web App in .net 8.0 (github.com).
Would you like to find out more about exciting topics from the world of adesso? Then take a look at our previous blog posts.

